Ever had your PC act up after a bad update or rogue software? Don’t panic—System Restore might just be your digital lifeline. This powerful Windows feature lets you roll back your system to a healthier state, undoing changes that caused chaos. Let’s dive into how it works, when to use it, and how to master it like a pro.
What Is System Restore and How Does It Work?

System Restore is a built-in recovery tool in Microsoft Windows that allows users to revert their computer’s system files, settings, and installed programs to a previous point in time. It’s designed to help fix issues caused by software conflicts, driver problems, or failed updates—without affecting personal files like documents, photos, or emails.


Understanding the Core Functionality
At its heart, System Restore works by creating ‘restore points’—snapshots of your system’s critical files, registry settings, and installed programs. These points are automatically generated before major system events such as software installations, Windows updates, or driver changes. You can also create them manually.
- Restore points capture system state, not personal data.
- Changes to programs and system settings are reversible.
- Personal files remain untouched during a restore.
When you initiate a System Restore, Windows compares the current system state with the selected restore point and reverts any altered system files and registry entries. This process can resolve many stability and performance issues without requiring a full OS reinstall.
How System Restore Differs From Backup Tools
It’s crucial to understand that System Restore is not a full backup solution. While tools like Windows Backup and Restore or third-party software create complete copies of your data, System Restore focuses solely on system integrity.
- System Restore: Reverts system files and settings.
- Full Backup: Saves all data, including personal files.
- System Image: A complete snapshot of the entire drive.
“System Restore is your safety net for system changes—not a replacement for regular data backups.”
When Should You Use System Restore?
Knowing when to trigger a System Restore can save you hours of troubleshooting. It’s most effective when your system becomes unstable due to recent changes. Here are the most common scenarios where System Restore shines.
After a Failed Windows Update
Windows updates are essential for security and performance, but they don’t always go smoothly. Sometimes, an update can cause boot failures, driver conflicts, or performance degradation. If your PC starts acting up right after an update, System Restore can roll back those changes.
- Boot into Safe Mode if the system won’t start normally.
- Use System Restore to revert to a point before the update.
- Consider pausing updates temporarily to avoid recurrence.
According to Microsoft’s support documentation, System Restore is recommended when updates cause boot issues or system instability.
Following Problematic Software Installation
Installing new software—especially from untrusted sources—can introduce registry errors, conflicting drivers, or malware-like behavior. If your system slows down or crashes after installing a program, System Restore can undo the installation’s system-level impact.
- Uninstalling the app manually may not fix registry corruption.
- System Restore reverts all system changes made during installation.
- Always create a restore point before installing new software.
Driver Conflicts and Hardware Changes
Updating or installing new drivers—especially for graphics cards or network adapters—can sometimes lead to blue screens or device malfunctions. System Restore can revert driver changes and restore stability.
- Use Device Manager to roll back drivers if System Restore isn’t available.
- System Restore is more comprehensive, reverting all related system changes.
- Always create a restore point before updating critical drivers.
How to Enable and Configure System Restore
System Restore isn’t always enabled by default, especially on new installations or certain Windows editions. You’ll need to activate it manually and configure disk space usage to ensure it works effectively.
Enabling System Restore on Windows 10/11
To turn on System Restore, follow these steps:
- Press Windows + R, type
sysdm.cpl, and press Enter. - Go to the System Protection tab.
- Select your system drive (usually C:), then click Configure.
- Choose Turn on system protection.
- Adjust the maximum disk space usage (recommended: 5-10%).
- Click Apply, then OK.
Once enabled, Windows will automatically create restore points before major system events. You can verify this by checking the “Protection Settings” section in the same window.
Setting Up Automatic Restore Points
Windows automatically creates restore points:
- Before installing Windows updates.
- Prior to installing signed software via Windows Installer.
- Once per day if no other events trigger creation.
However, you can manually trigger a restore point creation for added safety:
- Open Create a restore point from the Start menu.
- Click Create under the “Restore point” section.
- Enter a descriptive name (e.g., “Before Installing Adobe Suite”).
- Click Create and wait for confirmation.
Managing Disk Space for Restore Points
System Restore uses a portion of your hard drive to store restore points. By default, it’s limited to 5-10% of disk space, but you can adjust this:
- Too little space = fewer or no restore points.
- Too much space = reduced storage for personal files.
- Recommended: 8% for SSDs, 10% for HDDs with ample space.
Older restore points are automatically deleted when space runs out, following a first-in, first-out (FIFO) system. You can also manually delete all restore points via the Delete button in the Configure window—but this removes all history.
Step-by-Step Guide to Performing a System Restore
When your system is misbehaving, performing a System Restore can be a game-changer. Here’s how to do it safely and effectively.
Using System Restore from Windows
If you can boot into Windows normally or in Safe Mode:
- Open the Start menu and search for “Create a restore point”.
- Click System Restore at the bottom of the window.
- Click Next on the wizard.
- Select a restore point from the list (choose one before the problem started).
- Click Scan for affected programs to see what will be removed.
- Click Next, then Finish, and confirm.
The system will restart and begin the restoration process. This can take 10-30 minutes, depending on system speed and changes to revert.
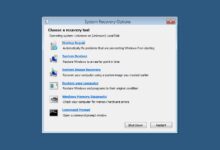
Using System Restore from Advanced Startup
If Windows won’t boot, you’ll need to access System Restore from the recovery environment:
- Restart your PC and press F8 or hold Shift while clicking Restart.
- Go to Troubleshoot > Advanced Options > System Restore.
- Log in with your admin account.
- Follow the same steps as above to select and apply a restore point.
This method is crucial when dealing with boot loops or critical system errors. Microsoft’s recovery documentation emphasizes this path for unbootable systems.
What Happens During the Restore Process?
During a System Restore, Windows performs several background operations:
- Replaces modified system files with versions from the restore point.
- Rolls back registry changes made after the restore point.
- Removes programs and drivers installed after the restore point.
- Preserves personal files, emails, and user profiles.
“The restore process doesn’t touch your documents, music, or videos—only system-level changes are reversed.”
After completion, you’ll see a confirmation message. If the restore fails, Windows will attempt to roll back the changes automatically.
Troubleshooting Common System Restore Issues
While System Restore is reliable, it doesn’t always work perfectly. Here are common issues and how to fix them.
System Restore Not Available or Grayed Out
If the System Restore button is disabled, it could be due to:
- System Protection turned off.
- Group Policy restrictions (common in corporate environments).
- Corrupted system files.
To fix:
- Enable System Protection via
sysdm.cpl. - Run
sfc /scannowin Command Prompt (Admin) to repair system files. - Check Group Policy Editor (
gpedit.msc) if available.
Restore Point Creation Fails
If Windows can’t create restore points, check:
- Disk space: Ensure at least 1 GB is free.
- Volume Shadow Copy service: Must be running.
- Antivirus interference: Temporarily disable real-time scanning.
Restart the Volume Shadow Copy service via Services.msc if needed.
System Restore Fails to Complete
If the restore process stops or reverts back, try:
- Using a different restore point.
- Running System Restore from Safe Mode.
- Using the Command Prompt method:
rstrui.exe.
In some cases, disk corruption may prevent restore. Use chkdsk C: /f to repair the drive before retrying.
Advanced Tips and Best Practices for System Restore
To get the most out of System Restore, follow these expert strategies.
Schedule Regular Manual Restore Points
Don’t rely solely on automatic points. Create manual ones before:
- Installing new software or games.
- Updating major drivers (GPU, motherboard).
- Changing system settings (registry, services).
This gives you precise control over recovery options.
Monitor Restore Point Health
Use the Vssadmin tool to check restore point status:
- Open Command Prompt as Administrator.
- Type
vssadmin list shadowsand press Enter. - Review the list of existing shadow copies (restore points).
This helps verify that points are being created and stored correctly.
Combine System Restore With Other Recovery Tools
For maximum protection, pair System Restore with:
- Regular file backups (OneDrive, external drives).
- System Image backups (via Windows Backup).
- Third-party tools like Macrium Reflect or Acronis.
This layered approach ensures you’re covered for both system and data recovery.
Alternatives to System Restore When It’s Not Enough
Sometimes, System Restore isn’t sufficient—especially if the issue predates the earliest restore point or if System Restore itself is corrupted.
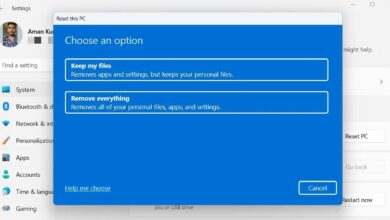
Using Windows Reset This PC
This feature reinstalls Windows while preserving or removing your files:
- Keep my files: Removes apps and settings, keeps personal data.
- Remove everything: Full wipe and reinstall.
Access it via Settings > System > Recovery. It’s more drastic but effective when System Restore fails.
System Image Recovery
If you’ve created a full system image backup, you can restore your entire drive to that state. This is the closest thing to a time machine for your PC.
- Requires prior image creation.
- Can be booted from USB or DVD.
- Restores OS, programs, settings, and files.
Learn more at Microsoft’s System Image guide.
Third-Party Recovery Software
Tools like Macrium Reflect, Acronis True Image, or EaseUS Todo Backup offer more flexibility than built-in tools:
- Schedule automated system images.
- Restore individual files from system backups.
- Clone drives for hardware upgrades.
These are ideal for power users and IT professionals.
Security Considerations and Risks of System Restore
While System Restore is a powerful tool, it’s not without risks—especially from a security standpoint.
Can Malware Survive a System Restore?
In some cases, yes. System Restore does not scan for or remove malware. If a virus was present before the restore point, it may return after restoration.
- Malware hiding in system files can be restored.
- Rootkits may persist across restore points.
- Always run a full antivirus scan after a restore.
Consider disabling System Restore temporarily during malware cleanup, then re-enable it afterward.
Privacy and Data Leakage Risks
Deleted files aren’t always erased from restore points. If you’ve deleted sensitive data, it might still exist in old snapshots.
- Use Disk Cleanup > Clean up system files > More Options to delete restore points.
- Enable encryption (BitLocker) to protect data in restore points.
- Avoid using System Restore on shared or public computers.
Disabling System Restore for Performance or Security
Some users disable System Restore to save disk space or enhance security. However, this removes a critical recovery option.
- SSDs benefit less from System Restore due to limited write cycles.
- Corporate environments may disable it via Group Policy.
- Always weigh the risks: recovery vs. space/security.
What is System Restore in Windows?
System Restore is a built-in Windows feature that allows you to revert your computer’s system files, settings, and installed programs to an earlier point in time, helping to fix issues caused by software changes, updates, or driver problems.
Does System Restore delete personal files?
No, System Restore does not delete personal files like documents, photos, or emails. It only affects system files, registry settings, and installed programs.
How do I enable System Restore?
Go to System Properties > System Protection, select your drive, click Configure, and choose “Turn on system protection.” You can also set the maximum disk space usage here.
Why is System Restore not working?
Common reasons include disabled System Protection, insufficient disk space, corrupted system files, or interference from antivirus software. Try running sfc /scannow or using Safe Mode to troubleshoot.
Can I use System Restore after a virus infection?
It’s risky. System Restore doesn’t remove malware and may restore infected files. It’s better to run a full antivirus scan first or use a reset option that removes everything.
System Restore remains one of Windows’ most underrated yet powerful recovery tools. When used correctly, it can save you from hours of troubleshooting, data loss, or costly repairs. By understanding how it works, when to use it, and how to maintain it, you gain a reliable safety net for your digital life. Combine it with regular backups and smart security practices, and you’ll be prepared for almost any system crisis. Don’t wait for disaster to strike—enable System Restore today and take control of your PC’s resilience.
Recommended for you 👇
Further Reading: